Creating your first ASP.NET Core Web API with Swashbuckle
June 11, 2016 by Anuraj
C# ASP.NET ASP.NET Core Documentation Swashbuckle
This post is to help developers on how to create interactive interface which represent their Restful API to provide a rich discovery, documentation and playground experience to their API consumers in ASP.NET Core Web API. First you need to create an ASP.NET Core web api project. In this post I am using the default project; I didn’t modified any code. Once you created the project you need add reference of Swashbuckle. For RC2 you need to add reference of 6.0.0-beta9 version.
Here is the project.json file.
{
  "dependencies": {
    "Microsoft.NETCore.App": {
      "version": "1.0.0-rc2-3002702",
      "type": "platform"
    },
    "Microsoft.AspNetCore.Mvc": "1.0.0-rc2-final",
    "Microsoft.AspNetCore.Server.IISIntegration": "1.0.0-rc2-final",
    "Microsoft.AspNetCore.Server.Kestrel": "1.0.0-rc2-final",
    "Microsoft.Extensions.Configuration.EnvironmentVariables": "1.0.0-rc2-final",
    "Microsoft.Extensions.Configuration.FileExtensions": "1.0.0-rc2-final",
    "Microsoft.Extensions.Configuration.Json": "1.0.0-rc2-final",
    "Microsoft.Extensions.Logging": "1.0.0-rc2-final",
    "Microsoft.Extensions.Logging.Console": "1.0.0-rc2-final",
    "Microsoft.Extensions.Logging.Debug": "1.0.0-rc2-final",
    "Swashbuckle": "6.0.0-beta9"
  },

  "tools": {
    "Microsoft.AspNetCore.Server.IISIntegration.Tools": {
      "version": "1.0.0-preview1-final",
      "imports": "portable-net45+win8+dnxcore50"
    }
  },

  "frameworks": {
    "netcoreapp1.0": {
      "imports": [
        "dotnet5.6",
        "dnxcore50",
        "portable-net45+win8"
      ]
    }
  }
}
And now you need modify startup file, to enable Swagger Generator and Swagger UI.Here the code for same. I am using the default urls, you can customize it. Here is the code. In the ConfigureServices method, Swagger Generator will be added and also configured.
public void ConfigureServices(IServiceCollection services)
{
    services.AddSwaggerGen();
    services.ConfigureSwaggerGen(options =>
    {
        options.DescribeAllEnumsAsStrings();
        options.SingleApiVersion(new Swashbuckle.SwaggerGen.Generator.Info
        {
            Title = "Values API",
            Version = "v1",
            Description = "An API API With Swagger for RC2",
            TermsOfService = "None"
        });
    });
    services.AddMvc();
}
And here the configure method where Swagger middleware added and configured.
public void Configure(IApplicationBuilder app, IHostingEnvironment env, ILoggerFactory loggerFactory)
{
    loggerFactory.AddConsole(Configuration.GetSection("Logging"));
    loggerFactory.AddDebug();
    app.UseMvc();
    app.UseSwaggerGen();
    app.UseSwaggerUi();
}
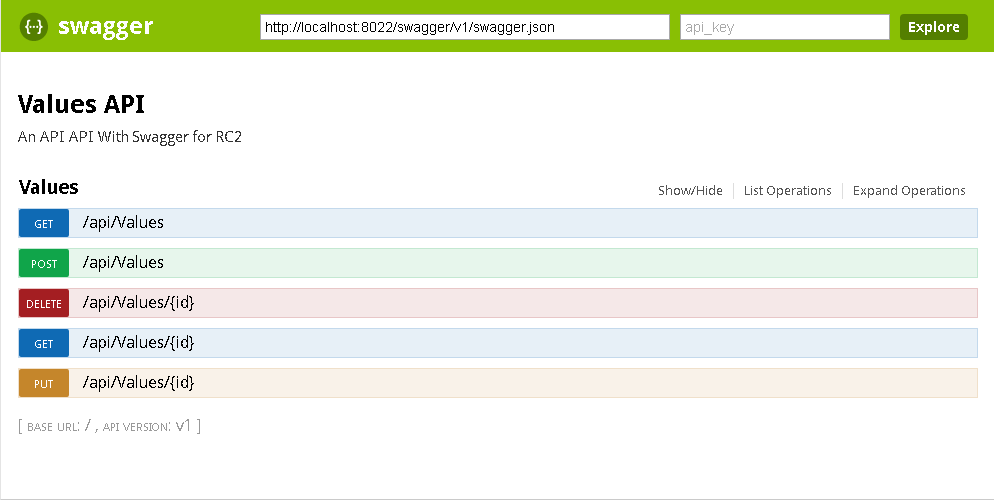
Now you can run the api page @ http://localhost:8022/swagger/ui/index.html. Here is the screenshot.

Swagger also support traditional xml comments to be included in the documentation. In the ConfigureServices method. For xml documentation generation, enable xml documentation checkbox in the project properties.

And you can include xml comments in the ConfigureServices method like this.
options.IncludeXmlComments(Path.ChangeExtension(Assembly.GetEntryAssembly().Location, "xml"));This is one option to include xml comments, which is included in the Swagger generated API page.
Happy Programming :)
Found this useful? Share it with your network!
Copyright © 2026 Anuraj. Blog content licensed under the Creative Commons CC BY 2.5 | Unless otherwise stated or granted, code samples licensed under the MIT license. This is a personal blog. The opinions expressed here represent my own and not those of my employer. Powered by Jekyll. Hosted with ❤ by GitHub
