How to deploy Azure WebJobs using PowerShell
February 19, 2019 by Anuraj
Azure WebJobs
This post is about how to deploy Azure Web Jobs using PowerShell. Recently I had to migrate an on premise application to Azure PAAS. The application has few console application, which is used to do schedule operations using Windows scheduled tasks. So as I migration to PAAS, I choose Azure WebJobs, so that I can easily convert the existing applications to Azure WebJobs. Only change I had to do is including two files - run.bat file for execution of the console app and settings.job file for the schedule interval configuration.
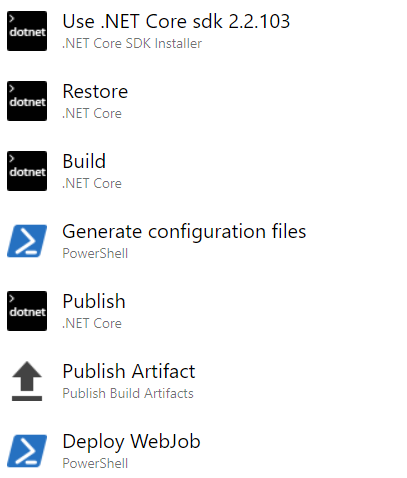
In this post I explaining how I implemented continuous deployment of the WebJobs using Azure DevOps and Powershell. So first I create a build pipeline for console application - this is a dotnet core console application. Here is the build and deployment pipeline.

In this pipeline, the Generate configuration files task will generate run.bat file and the settings.job file. Here is the YAML code for the same.
steps:
- powershell: |
   "dotnet.exe WebJobDemo.dll" | Out-File $(build.artifactstagingdirectory)\run.bat -encoding ascii
   "{ ""schedule"": ""0 */5 * * * *"" }" | Out-File $(build.artifactstagingdirectory)\settings.job -encoding ascii
  displayName: 'Generate configuration files'
Next Deploy WebJob task - this is also a powershell task, which deploy the WebJob zip file.
steps:
- powershell: |
   $files = Get-ChildItem -Path $(build.artifactstagingdirectory)\*.zip -Recurse
   Test-Path -Path $files[0]

   $authHeader = " Basic YXp1cmUgd2ViIGpvYnMKYXp1cmUgd2ViIGpvYnMKYXp1cmUgd2ViIGpvYnM="

   Write-Host "Trying to update the Web Jobs"
       $ZipHeaders = @{
           Authorization = $authHeader
           "Content-Disposition" = "attachment; filename=$($files[0].Name)"
       }
       $schedulerName = "DemoWebJob"
       Write-Host "Processing File:" $schedulerName
       $response = Invoke-WebRequest -Uri https://azurewebapp.scm.azurewebsites.net/api/triggeredwebjobs/$schedulerName -Headers $ZipHeaders -InFile $files[0] -ContentType "application/zip" -Method Put
       Write-Host `n`n$response`n`n

   Write-Host "Finish the updated"
  displayName: 'Deploy WebJob'
In this script, I am looking for zip file from the published artifacts directory, then uploading it to the Web App using Kudu REST API. You can create the authentication header by combining deployment credentials from the publish settings file and convert it to base64 encoded string.

This example was using Kudu API, you can use Azure CLI and API as well to deploy Azure WebJobs.
Happy Programming :)
Found this useful? Share it with your network!
Copyright © 2026 Anuraj. Blog content licensed under the Creative Commons CC BY 2.5 | Unless otherwise stated or granted, code samples licensed under the MIT license. This is a personal blog. The opinions expressed here represent my own and not those of my employer. Powered by Jekyll. Hosted with ❤ by GitHub
