Implementing API Key Authentication in ASP.NET Core
June 23, 2024 by Anuraj
AspNetCore DotNet
In this blog post, we’ll learn how to implement API Key Authentication in ASP.NET Core. When exposing API endpoints to other developers or consumers it is a best practice to implement authentication system. Api Key authentication is very easy to implement and configure. In this approach, developers need to provide the API Key along with the request details.
Creating ASP.NET Core Web API
We can implement the authentication mechanism in various ways, but for this blog post we are implementing it using AuthenticationHandler class. First we will create an ASP.NET Core Web API project - we can create with controllers or Minimal API style - it works in both styles. We can create the Web API project using the command dotnet new webapi --name WeatherForecast.Api --output WeatherForecast.Api\Src\WeatherForecast.Api --use-controllers - this command will create a web api application, the --use-controllers parameter will create the project with controllers, by default the web api project will be created with Minimal API.
Implementing the Authentication Configuration option
After creating the project, we need to create ApiKeyAuthenticationSchemeOptions which inherits from AuthenticationSchemeOptions class - this class will use to configure the authentication options.
public class ApiKeyAuthenticationSchemeOptions:AuthenticationSchemeOptions
{
    public string? ApiKey { get; set; }
}
In the above code, we are creating an ApiKey property which we will be reading from the configuration. And we will be comparing it with the value we receive from the Authentication header.
Implementing the Authentication Handler
Next we need to implement ApiKeyAuthenticationSchemeHandler which will be inheriting from AuthenticationHandler class - as the name implies this class will handle the authentication requests. Here is the implementation.
public class ApiKeyAuthenticationSchemeHandler : AuthenticationHandler<ApiKeyAuthenticationSchemeOptions>
{
    public ApiKeyAuthenticationSchemeHandler(IOptionsMonitor<ApiKeyAuthenticationSchemeOptions> options, ILoggerFactory logger,
        UrlEncoder encoder, ISystemClock clock) : base(options, logger, encoder, clock)
    {
    }

    protected override Task<AuthenticateResult> HandleAuthenticateAsync()
    {
        if (!Request.Headers.TryGetValue("X-Api-Key", out var apiKeyHeaderValues))
        {
            return Task.FromResult(AuthenticateResult.Fail("Missing API Key"));
        }

        var apiKey = apiKeyHeaderValues.FirstOrDefault();
        if (string.IsNullOrEmpty(apiKey))
        {
            return Task.FromResult(AuthenticateResult.Fail("Missing API Key"));
        }

        if (apiKey != Options.ApiKey)
        {
            return Task.FromResult(AuthenticateResult.Fail("Invalid API Key"));
        }

        var claims = new[] { new Claim(ClaimTypes.Name, "API User") };
        var identity = new ClaimsIdentity(claims, Scheme.Name);
        var principal = new ClaimsPrincipal(identity);
        var ticket = new AuthenticationTicket(principal, Scheme.Name);
        return Task.FromResult(AuthenticateResult.Success(ticket));
    }
}
We will get some warnings once we implement this class - in .NET 8.0 the ISystemClock interface is deprecated. We can remove this from the parameter and this warning will be removed. Here is the updated implementation.
public class ApiKeyAuthenticationSchemeHandler : AuthenticationHandler<ApiKeyAuthenticationSchemeOptions>
{
    public ApiKeyAuthenticationSchemeHandler(IOptionsMonitor<ApiKeyAuthenticationSchemeOptions> options,
        ILoggerFactory logger, UrlEncoder encoder) : base(options, logger, encoder)
    {
    }

    protected override Task<AuthenticateResult> HandleAuthenticateAsync()
    {
        if (!Request.Headers.TryGetValue("X-Api-Key", out var apiKeyHeaderValues))
        {
            return Task.FromResult(AuthenticateResult.Fail("Missing API Key"));
        }

        var apiKey = apiKeyHeaderValues.FirstOrDefault();
        if (string.IsNullOrEmpty(apiKey))
        {
            return Task.FromResult(AuthenticateResult.Fail("Missing API Key"));
        }

        if (apiKey != Options.ApiKey)
        {
            return Task.FromResult(AuthenticateResult.Fail("Invalid API Key"));
        }

        var claims = new[] { new Claim(ClaimTypes.Name, "API User") };
        var identity = new ClaimsIdentity(claims, Scheme.Name);
        var principal = new ClaimsPrincipal(identity);
        var ticket = new AuthenticationTicket(principal, Scheme.Name);
        return Task.FromResult(AuthenticateResult.Success(ticket));
    }
}
In this implementation, first we will be trying to get X-Api-Key header value, if it is not available, we will return an authentication failure error. Next we will be validating whether the value is empty or not. And finally we will verify the value we received as part of the request is same as the one we read from configuration. If all the conditions are satisfied, we will be creating a identity and returns it.
Configuring the Api Key authentication
We can associate the ApiKey authentication in our Web API like this.
builder.Services.AddAuthentication("ApiKey")
    .AddScheme<ApiKeyAuthenticationSchemeOptions, ApiKeyAuthenticationSchemeHandler>("ApiKey",
    options => { options.ApiKey = builder.Configuration["ApiKey"]; });
We also need to add the ApiKey in the appsettings.json file.
{
  "Logging": {
    "LogLevel": {
      "Default": "Information",
      "Microsoft.AspNetCore": "Warning"
    }
  },
  "AllowedHosts": "*",
  "ApiKey": "1234567890"
}
We have completed the configuration, next we need to attribute the controllers or methods with [Authorize] attribute to protect them from anonymous access.
[Authorize]
public class WeatherForecastController : ControllerBase
{
}
Now we can call the /WeatherForecast endpoint without X-Api-Key header and which will return not authorized (401) error. Next we can send the request with X-Api-Key header and we will get the proper response.
Configure Swagger UI to support Api Key authentication
For support Api Key authentication, we need to add SecurityDefinition in Swagger. Here is the implementation.
builder.Services.AddSwaggerGen(options =>
{
    options.AddSecurityDefinition("ApiKey", new OpenApiSecurityScheme
    {
        Description = "X-API-KEY must appear in header",
        Type = SecuritySchemeType.ApiKey,
        Name = "X-API-KEY",
        In = ParameterLocation.Header,
        Scheme = "ApiKeyScheme"
    });

    var key = new OpenApiSecurityScheme()
    {
        Reference = new OpenApiReference
        {
            Type = ReferenceType.SecurityScheme,
            Id = "ApiKey"
        },
        In = ParameterLocation.Header
    };
    var requirement = new OpenApiSecurityRequirement { { key, new List<string>() } };
    options.AddSecurityRequirement(requirement);
});
Now run the application, we will be able to see the Authorize button. And clicking on it will open a dialog like this
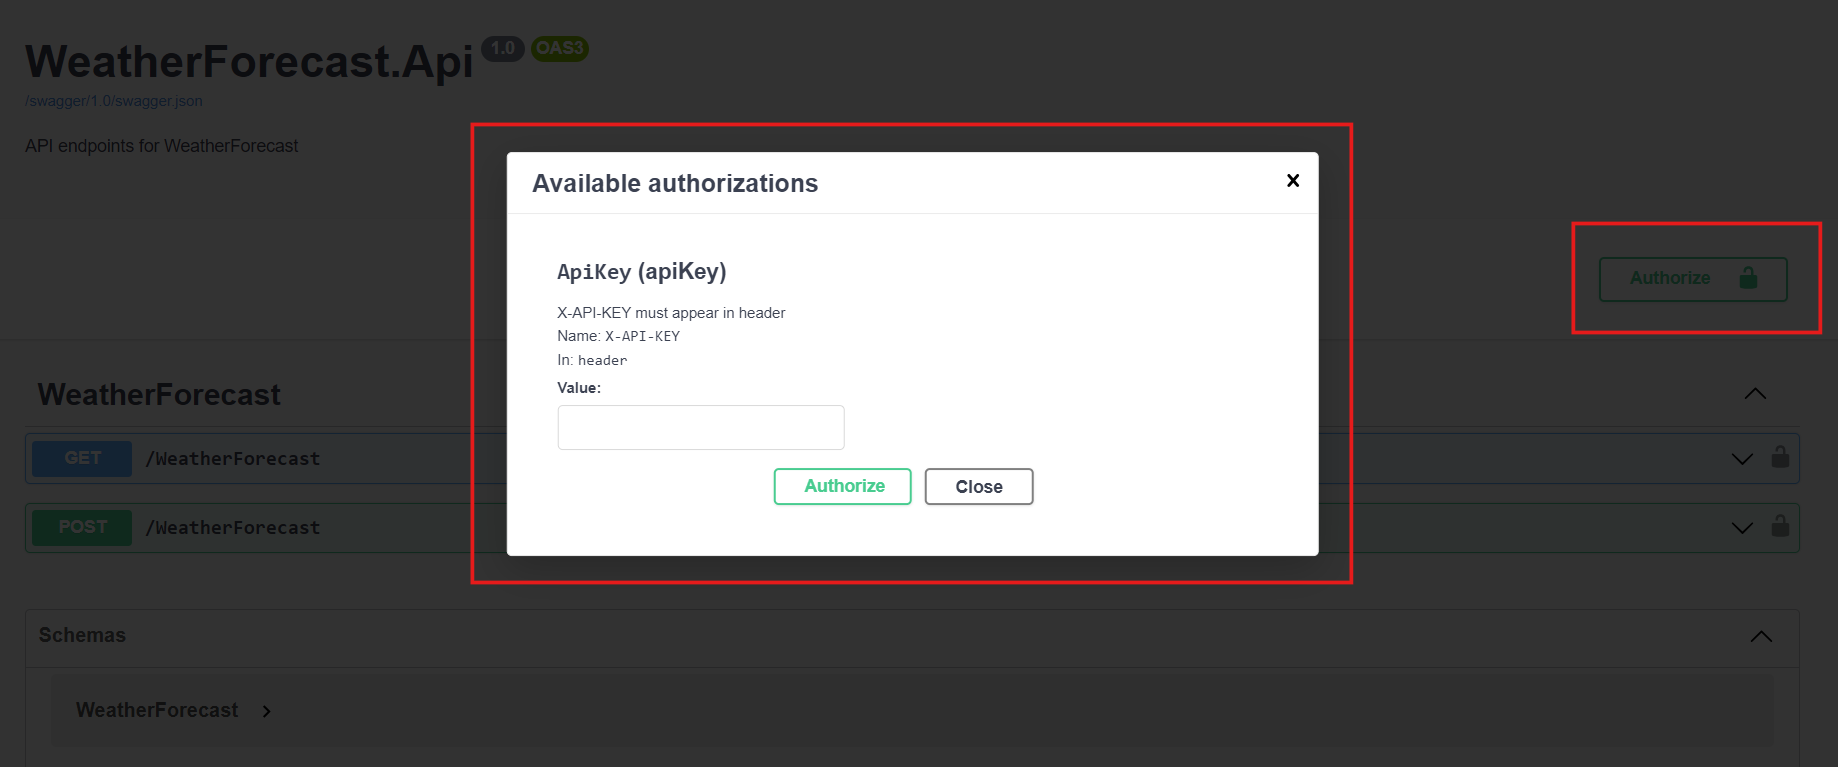
Where we can enter the API Key and help us call the API endpoints.
The implementation will work with Minimal APIs as well. For Minimal APIs instead of Authorize attribute we need to use RequireAuthorization method.
app.MapGet("/weatherforecast-minimal", () =>
{
    string[] Summaries = new[]
    {
        "Freezing", "Bracing", "Chilly", "Cool", "Mild", "Warm", "Balmy", "Hot", "Sweltering", "Scorching"
    };

    return Enumerable.Range(1, 5).Select(index => new WeatherForecast.Api.WeatherForecast
    {
        Date = DateTime.Now.AddDays(index),
        TemperatureC = Random.Shared.Next(-20, 55),
        Summary = Summaries[Random.Shared.Next(Summaries.Length)]
    }).ToArray();
}).RequireAuthorization();
In this blog post, we learned about implementing Api Key Authentication and how to use it with Swagger UI. The source code for this blog post available in GitHub
Happy Programming
If you find my content helpful, consider supporting my work. Your support helps me continue creating valuable resources for the community.

Found this useful? Share it with your network!
Copyright © 2026 Anuraj. Blog content licensed under the Creative Commons CC BY 2.5 | Unless otherwise stated or granted, code samples licensed under the MIT license. This is a personal blog. The opinions expressed here represent my own and not those of my employer. Powered by Jekyll. Hosted with ❤ by GitHub