Working with Azure Blob storage in ASP.NET Core
April 06, 2017 by Anuraj
Azure Blob storage ASP.NET Core
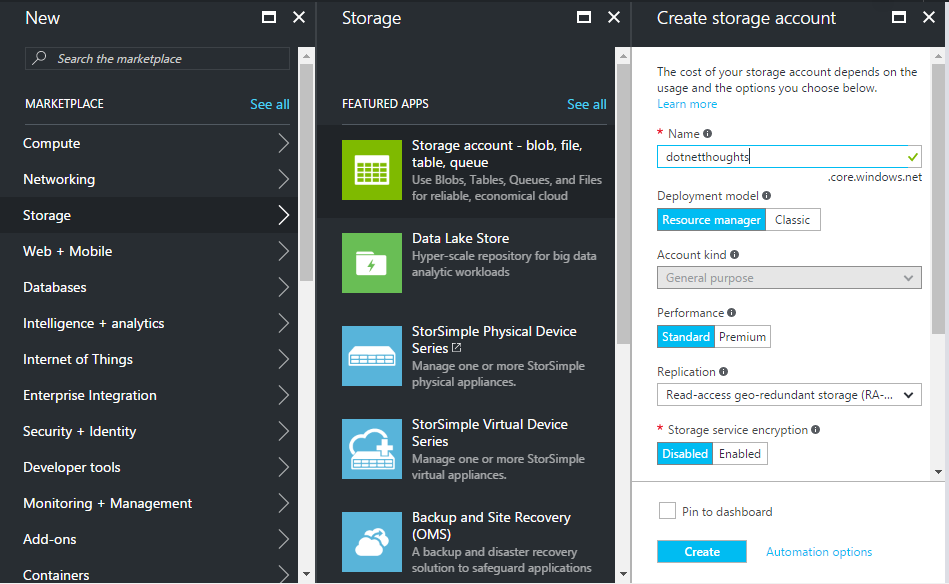
This post is about uploading and downloading images from Azure Blob storage using ASP.NET Core. First you need to create a blob storage account and then a container which you’ll use to store all the images. You can do this from Azure portal. You need to select Storage > Storage Account - Blob, file, Table, Queue > Create a Storage Account.

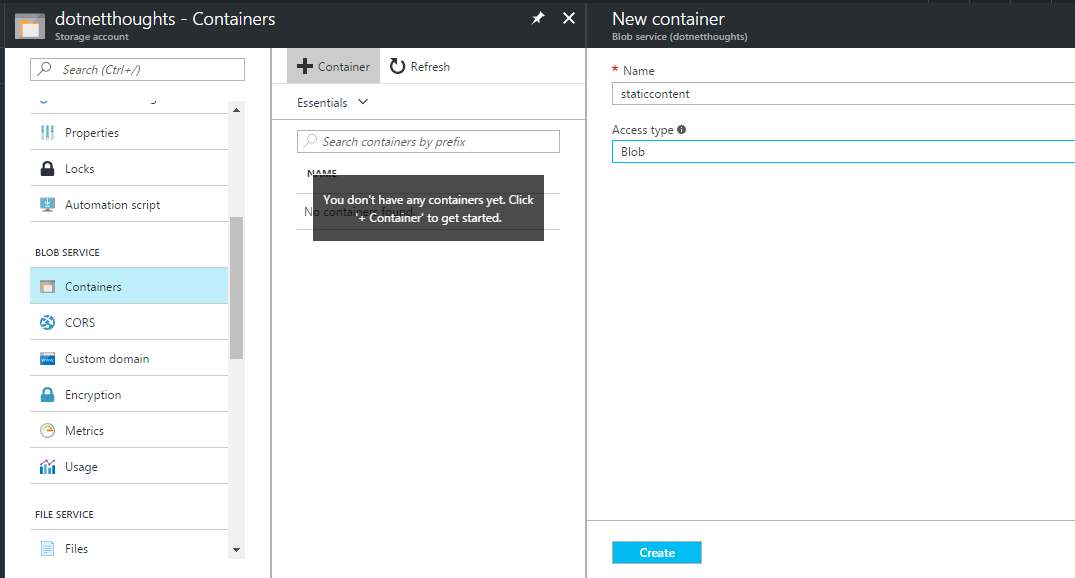
Once you created a storage account, you need to create a container, you can create container from Containers menu under Blob Service. You need to provide a name and change the access type to Blob.

You need to use access keys to authenticate your applications when making requests to this Azure storage account. You can get the access keys from Settings > Access Keys. You can copy the connection string from the portal and can be used in the appsettings.json file.
For accessing the azure storage account, you need WindowsAzure.Storage package reference. Here is my CSProj.
<ItemGroup>
    <PackageReference Include="Microsoft.AspNetCore" Version="1.1.1" />
    <PackageReference Include="Microsoft.AspNetCore.Mvc" Version="1.1.2" />
    <PackageReference Include="Microsoft.AspNetCore.StaticFiles" Version="1.1.1" />
    <PackageReference Include="Microsoft.Extensions.Logging.Debug" Version="1.1.1" />
    <PackageReference Include="Microsoft.VisualStudio.Web.BrowserLink" Version="1.1.0" />
    <PackageReference Include="WindowsAzure.Storage" Version="8.1.1" />
</ItemGroup>
For uploading, you need to create an instance of CloudStorageAccount, then you need to create Blob client. Once you get the blob client instance, you need to get the container reference, by providing the container name. Using the container, you can get the blob reference, which will help you to upload the file to blob storage. Here is the code.
var connectionString = _configuration["AzureStorageAccountConnectionString"];
var storageAccount = CloudStorageAccount.Parse(connectionString);
var blobClient = storageAccount.CreateCloudBlobClient();
var container = blobClient.GetContainerReference("staticcontent");
var file = picture.File;
var parsedContentDisposition =
    ContentDispositionHeaderValue.Parse(file.ContentDisposition);
var filename = Path.Combine(parsedContentDisposition.FileName.Trim('"'));
var blockBlob = container.GetBlockBlobReference(filename);
await blockBlob.UploadFromStreamAsync(file.OpenReadStream());
And you can get the images from Container using the container.ListBlobsSegmentedAsync() method.
var urls = new List<string>();
var connectionString = _configuration["AzureStorageAccountConnectionString"];
var storageAccount = CloudStorageAccount.Parse(connectionString);
var blobClient = storageAccount.CreateCloudBlobClient();
var container = blobClient.GetContainerReference("staticcontent");
var listBlobItems = await container.ListBlobsSegmentedAsync
    ("", true, BlobListingDetails.All, 200, null, null, null);
You can enumerate on the listBlobItems.Results property and can get all the files in the specified container. The ListBlobsSegmentedAsync() method helps you to configure paging and type of results etc.
Happy Programming :)
Found this useful? Share it with your network!
Copyright © 2026 Anuraj. Blog content licensed under the Creative Commons CC BY 2.5 | Unless otherwise stated or granted, code samples licensed under the MIT license. This is a personal blog. The opinions expressed here represent my own and not those of my employer. Powered by Jekyll. Hosted with ❤ by GitHub
